

Hey there!
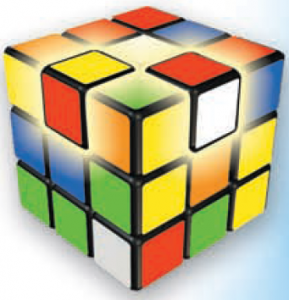
Welcome to the "Rubiks Cube Solution Guide", I'm sure that you are very excited to learn to solve the Rubik's Cube on your own. Rubiks Cube is a very fun puzzle to solve. It involves rotating the faces of the cube either clockwise or anticlockwise while try to make the cube look like the one in the image above.
Here is a fun fact: There are 43,252,003,274,489,856,000 Possible combinations for a Rubiks cube! With that said, I hope you get the complexity of this thing.
I'm sure you've raged over the cube many times while attempting to solve it on your own. Fret not, because you've come to the right place to learn it. I'll teach you How to Solve the Rubiks Cube by using the Beginner's method a.k.a Layer by Layer Method and I'll give a 100% guarantee that you'll be able to solve the cube all by yourself after you go through my guide. So first things first, let's get to the basics!
Basics
Definitions of Rubiks Cube Pieces
-
Edge Pieces
All the pieces with 2 colors are called Edge Pieces. There are 12 Edge Pieces.
-
Corner Pieces
All the pieces with 3 colors are called Corner Pieces. There are 8 Edge Pieces.
-
Center Pieces
All the pieces with 1 color are called Center Pieces. There are 6 Center Pieces. And note that center pieces DO NOT MOVE and they represent the side of their color. The six colors are Red, Orange, Blue, Green, Yellow and White.
Note: Every Edge Piece and Corner Piece on the cube is unique and it's home position is always between the center pieces of the colors on that Piece.
The Opposites
Since the center pieces don't move, these center pieces are always opposite to each other,
- White opposite to Yellow.
- Red opposite to Orange.
- Blue opposite to Green.
Cube Notations
In the guide you'll come across algorithms that you have to apply to the cube after matching it to a particular case, and in order to apply these algorithms, you need to be aware of the cube notations. So the basic cube notations are as follows. 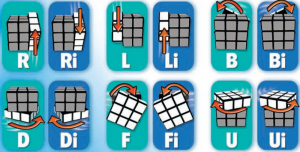
Clockwise notations are :
- R is for Right face and L is for Left face
- F is for Front face and B is for Back face
- U is for Up face and D is for Down face
And an 'i' after the face name indicates that you have to turn that side Anti Clockwise.
NOTE: Keep in mind that you must never rotate the cube when you apply an algorithm unless the algorithm specifies you to do so. If you rotate the cube when you apply an algorithm, you might end up messing up the cube!
Alrighty! Now you know all the cube basics. So, I've divided the whole process into 4 steps. And these steps are:
- First Layer
- Middle Layer
- Orientation of Last Layer
- Permutation of Last Layer
STEP 1: First Layer
Your intermediate goal at this stage is to make a white cross, which looks like this: 
Your final goal at this stage is to make your cube look like this: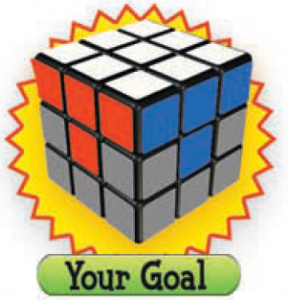
Since solving the first layer can be done just by intuition and without memorizing any algorithm, I recommend that you learn to solve it by watching the video below.
Follow the video tutorial below to learn to solve the first layer.
Got any doubts? Ask it in the comments section down below.